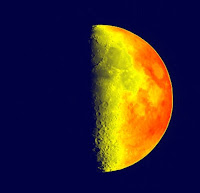
False colors, or pseudocolors, is the method you use when you want to augment grayscale pictures with predetermined colors.
It is very different from recolorization, where you try to retrieve the plausible true colors of an old picture or movie, shot when only black & white recording systems where widely available. Recolorization is somewhat mathematically tricky, whereas pseudocoloring is very straightforward : you map every specific pixel intensity (the "whiteness" value of the pixel) of the original image to the triplet of RGB values from a given color scale.
It is widely used in aerial photography, in thermal imagery and other field where you can provide that new channel of information to literally shed a new light on the data (pun intended...).
You can use different technique to choose the triplet of RGB values.
From now, I'm going to give some code more specifically linked to OpenCV.
Here, for example, you can see the use of sine functions to retrieve three different values for each channel. It's quick, but it's not always easy to know which white intensity is going to match which color.
What I'm providing here is a straight mapping from pixel value in the grayscale range to a specific color, chosen from a color table. That color table is provided as an image.
The white intensity value is in the range 0 to 255 (8 bit depth image) and the color is represented as a classic R([0..255]),G([0..255]),B([0..255]) triplet.
You can use LUT functions in OpenCV to construct LookUp Tables, but I wanted to try something more handcrafted.
The idea is really simple : you draw a color gradient on an image of 255 pixels height, and with a width of 1 pixel, which is going to be your colormap.
From the grayscale image, you take the value of each and every pixel, and you search in the colormap at the coordinates (0,intensity_value) (in fact, you must do that three times, one per color channel R,G and B).
The 3 values stored at those coordinates are your new colored pixel value !
The 3 values stored at those coordinates are your new colored pixel value !
I stretched a bit the width of the colormap, it's easier to visually check the colors, but only the first column of the image is really used by the code.
(In the provided example archive, the colormap is a JPEG file. For the best result, you need to use a non-destructive file format, like PNG or BMP).
In OpenCV, you use cvSplit() to get three different images as color channel from the original.
I provide a quick Visual Studio example, using OpenCV, to color a grayscale picture given on the command line to a new color mapped picture. You must also provide the name of the colormap. The program writes the produced colored image as a bitmap.
On the baboon example, you can see that since the grays in the original image are centered around a midpoint (close to 128). There isn't a lot of very dark or very bright gray in the image, so the resulting picture is mostly yellow, the middle color of the color map. It can be interesting to do some small image enhancement on the original before using the recoloring (something like Histogram Stretching, to cover more evenly the range from black to white).
Here's a link to the code archive, you can also browse the code on GitHub.
I used OpenCV's C syntax. The example can be compiled from Visual Studio 2005, and should work with more recent builds.
(And by the way, the moon picture is public domain, the baboon picture is coming from the OpenCV install directory).


Thanks for sharing this great code.
RépondreSupprimerI have a problem when I use different image instead of baboon. I created a gray scale image in Photoshop and it has the same size as baboon. but I got me an error when trying it.
Any clue ?
Thanks in advanced!
Ali
@ali daneshmandi : what kind of error are you having ?
RépondreSupprimer